proxy_wall
自从shadowsocks出来,我们的上网问题算是解决了,通过google查资料确实更便利
shadowsocks安装
对于新手 作者建议安装在ubuntu上,那就用他开始吧
接着就可以愉快的玩耍了
- 卸载shadowsocks
先停掉服务 sudo ssserver -d stop
然后 pip uninstall shadowsocks
shadowsocks-libev安装
ubuntu 17
1 | |
如果是其他版本可以看下面 参考
from :https://github.com/shadowsocks/shadowsocks-libev#install-from-repository
- 启动测试连接
和shadowsocks启动类似 ssserver 换成了 ss-server
启动测试 :
ss-server -s 0.0.0.0 -p 8388 -k 123456 -m aes-256-cfb没有-d start
可能会占用端口配置文件启动
To run in the foreground:ss-server -c /etc/shadowsocks-libev/config.jsonTo run in the background:
`nohup ss-server -c /etc/shadowsocks-libev/config.json`停止运行:
sudo ss-server -d stop
配置ubuntu开机启动
- home下 新建 run_server.sh
输入
1 | |
修改脚本权限
一定要让脚本具备可执行权限,可以执行如下指令:$ sudo chmod 755 run_server.sh将脚本放置在启动路径下
将run_server.sh移动到/etc/init.d路径下,可以直接拷贝,也可以链接过去$ sudo cp run_server.sh /etc/init.d/将脚本添加到启动脚本。
执行如下指令,在这里90表明一个优先级,越高表示执行的越晚
1 | |
- 如何移除该脚本
很简单,执行如下指令:sudo update-rc.d -f run_server.sh remove
http://jackqdyulei.github.io/2016/03/06/linux-auto-script/
设置系统全局代理
https://blog.csdn.net/u012810317/article/details/52139361
terminal代理
1
2export http_proxy=http://127.0.0.1:7890
export https_proxy=http://127.0.0.1:7890或者
git config –global http.proxy “localhost:1080”
git config –global http.proxy “localhost:1080”
git clone –recurse-submodules git@github.com:shadowsocks/shadowsocks-android.git
修改包名
把apk改成 shadowsocks.apk
1
2
3
4
5
6
7java -jar apktool.jar d shadowsocks.apk //解包
//中间做修改
java -jar apktool.jar b shadowsocks //打成apk再dist目录下
jarsigner -verbose -keystore androidTest.jks -signedjar signed.apk AndroidTest.apk test //生成签名
jarsigner -verbose -keystore androidTest.jks -signedjar signed.apk shadowsockstt.apk test
windows全局代理
https://www.flyzy2005.com/fan-qiang/shadowsocks/proxifier-with-shadowsocks/
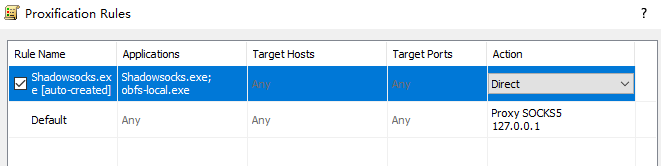
win7下使用
- 首先下载 Microsoft .NET Framework 4.6.2,但是win7系统不支持安装
- 下载 需要升级为Windows 7 SP1 需要去官网下载 Windows 7 SP1
VR INSTALL
- 安装
https://toutyrater.github.io/prep/install.html
Install
wget https://install.direct/go.sh sudo bash go.sh$ sudo systemctl start v2ray1
2
3
4
5
6
7
8
9
3. check
cat /etc/v2ray/config.json
you will see the config,I won't be change it
4. ff
git config --global http.proxy socks5://127.0.0.1:10811
2
3
4
5
6
7
8
9
10
11
12
13
14
sudo: unable to resolve host vm8l
5. $ cat /etc/hostname
vm8lcxg8.hostflyte.com
or you could use this[vr使用](https://github.com/233boy/v2ray/wiki/V2Ray%E6%90%AD%E5%BB%BA%E8%AF%A6%E7%BB%86%E5%9B%BE%E6%96%87%E6%95%99%E7%A8%8B)
* macOS use
proxy
Github slowly
git config –global https.proxy socks5://127.0.0.1:1081
1 | |
export http_proxy=http://127.0.0.1:7890
export https_proxy=http://127.0.0.1:7890
1 | |
sudo dscacheutil -flushcache
1 | |
google 搭建vr
查看网络详情 -》防火墙
按照这个教程 https://zelikk.blogspot.com/2019/01/gcp-v2ray-firewall.html
网络标记就选了全部实例
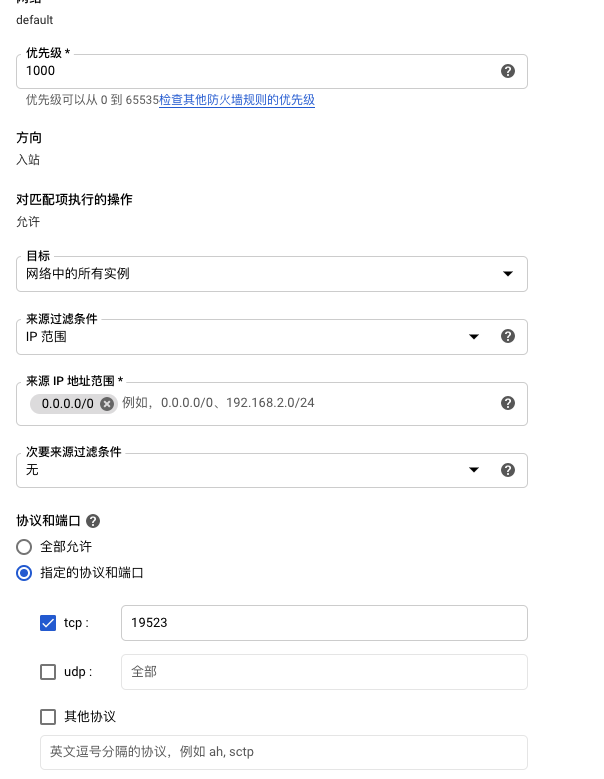
注意复制的端口号 带上了逗号
root身份运行
-bash: sudo: command not found
1 | |
root运行
1 | |
安装
1 | |
设置mac终端走ssr或者是v2ray代理
https://github.com/v2fly/fhs-install-v2ray/blob/master/README.zh-Hans-CN.md
注意配置 tcp端口
wordpress backup
bridge mode
https://www.bilibili.com/video/BV1wa411H7NJ/
V2rayU 需要全局的才起作用
[https://pagespr.pages.dev/trojan]
[https://workerpr.huaiyiheyuan.workers.dev/trojan123]
[https://pagespr.pages.dev/trojan]
client needs fragments 分片feature
ws 端口(port):7个http端口可任意选择(80、8080、8880、2052、2082、2086、2095)
tls 端口(port):6个https端口可任意选择(443、8443、2053、2083、2087、2096)
airport
FlowerCloud(中转机场)
11.LinkCube(中转机场)
DuyaoSS-机场测速和简介 [SS/SSR/V2Ray/Trojan] 【联通】更新中 - DuyaoSS-机场测速和简介
13.FastLink(中转机场): 跑路
FacMata(中转机场)
青云梯(中转机场)
38.ssLinks(中转机场)
42.Aladdin(中转机场)
【高等级专线/专线机场】Fancy network:15元120G/28元240G/56元500G 不限制合租 - 性价比机场测速
【专线/分站】V2tun机场:58元/季/每月200G流量 ytoo分站/每月打折 - 性价比机场测速
youtulink3 不能解锁max
tutugood 不能解锁
德国节点机场
DuyaoSS-机场测速和简介 [SS/SSR/V2Ray/Trojan] 【联通】更新中 - DuyaoSS-机场测速和简介
TKV Network :开学季全场8折优惠: PCF7KIY38Y ,有效期至:2024-12-31 : 不能解锁max
ssrcloud.
Arisaka : 不行,工单无回应,无客服。
大哥云 : 购买不退款
库洛米
MITCE : 可以解锁max,节点不稳定
小旋风
MESL : 不行
BitzNet 测评 : 德国专线
BitzNet : *netflix***不能解锁
万达云 : Americat node unable to unlock hbomax