StateBar
https://developer.android.com/training/appbar/setting-up.html
https://github.com/xiewenfeng/statusbartextcolorchange
https://mp.weixin.qq.com/s/NvmOlJzEkdrJREueIFd_DA
目前只要考虑 5.0以上系统就可以了,有些flag虽然被标记为Deprecated,但是系统也还在用,所以有必要研究。
statebar
https://www.jianshu.com/p/f84f7e07e0d6
https://blog.csdn.net/u011200604/article/details/107959340
实现沉浸式状态栏主要跟以下四个Api相关:
- View#setSystemUiVisibility()
- Window#addFlags()
- View#setFitsSystemWindows
- Window#setStatusBarColor()
View#setSystemUiVisibility()及其各种Flags
首先setSystemUiVisibility()这个方法就是设置状态栏或者导航栏的各种属性的,哪都有些可以设置的属性呢?
- View.SYSTEM_UI_FLAG_FULLSCREEN
视图全屏并隐藏状态栏,当用户交互时(如下滑状态栏)会恢复隐藏的状态栏(例子:电子书阅读)缺点:进入Activity会产生一个从非全屏到全屏的闪动效果

View.SYSTEM_UI_FLAG_IMMERSIVE_STICKY
粘性沉浸模式,需要和SYSTEM_UI_FLAG_FULLSCREEN或者SYSTEM_UI_FLAG_HIDE_NAVIGATION联用,当使用View.setSystemUiVisibility(View.SYSTEM_UI_FLAG_FULLSCREEN|View.SYSTEM_UI_FLAG_IMMERSIVE_STICKY)联用时视图全屏,当用户产生交互时(如下滑状态栏)不会恢复状态栏,只会以半透明的方式覆盖在视图上面并在一定时间内自动消失
1
getWindow().getDecorView().setSystemUiVisibility(View.SYSTEM_UI_FLAG_FULLSCREEN|View.SYSTEM_UI_FLAG_IMMERSIVE_STICKY)

View.SYSTEM_UI_FLAG_IMMERSIVE:
沉浸模式,只能和View.SYSTEM_UI_FLAG_FULLSCREEN联用,效果和View.SYSTEM_UI_FLAG_IMMERSIVE_STICKY一样,目前已被后者替代。View.SYSTEM_UI_FLAG_LOW_PROFILE:
低配模式,会隐藏一些不重要的状态栏和导航栏的图标,(用模拟器跑,只剩下电池了)View.SYSTEM_UI_FLAG_LAYOUT_FULLSCREEN:
视图全屏且不会产生闪动,如果没有toolbar,contentview会占住statebar的位置,状态栏会覆盖在contentview上面.1
2
3
4
5
6
7
8
9
10
11var isWhite = false
fun change_statebar_element_color(view: View) {
if (isWhite) {
window.decorView.systemUiVisibility = SYSTEM_UI_FLAG_LAYOUT_STABLE //statebar 元素显示白色
isWhite = false
} else {
window.decorView.systemUiVisibility =
SYSTEM_UI_FLAG_LAYOUT_FULLSCREEN or SYSTEM_UI_FLAG_LIGHT_STATUS_BAR //显示黑色
isWhite = true
}
}View.SYSTEM_UI_FLAG_LAYOUT_STABLE:
使视图稳定,当使用fitSystemWindows()(下面会介绍这个方法)需要视图稳定,一般和SYSTEM_UI_FLAG_LAYOUT_FULLSCREEN联用,我使用这个属性后,能使statebar的电池条变成白色。View.SYSTEM_UI_FLAG_LIGHT_STATUS_BAR:
Android6.0系统以上增加的属性,设置了这个属性,状态栏会以与状态栏背景颜色兼容的模式绘制。什么意思呢?就是说如果当前的状态栏颜色是浅色,那么就有可能造成状态栏上的图标看不清了,但是如果你设置这个属性以后,状态栏的图标就会以深色绘制,这样就没有什么UI上的问题了。
Window#addFlags()
这种方式感觉是setSystemUiVisibility之前的用法了。
WindowManager.LayoutParams相关属性:
- FLAG_TRANSLUCENT_STATUS:
Android4.4系统增加的属性,它会使状态栏透明,并且自动执行View.SYSTEM_UI_FLAG_LAYOUT_STABLE和View.SYSTEM_UI_FLAG_LAYOUT_FULLSCREEN - FLAG_FULLSCREEN:
视图全屏并隐藏状态栏,效果相当于View.SYSTEM_UI_FLAG_FULLSCREEN+View.SYSTEM_UI_FLAG_IMMERSIVE_STICKY,并且视图稳定(不会因为系统控件的变化(如输入法),而重新布局) - FLAG_FORCE_NOT_FULLSCREEN:
重写了FLAG_FULLSCREEN并强制显示状态栏(没有啥用) - FLAG_DRAWS_SYSTEM_BAR_BACKGROUNDS:
Android5.0系统以上支持,如果设置了该属性,系统栏(状态栏和导航栏)将以透明背景绘制,并且该窗口中的相应区域将填充setStatusBar()和setNavigationBarColor()中设置的颜色。 现在项目就是用这种方式。- 感觉这也是设置stateBar颜色一种主要的方式。
- 另一种就是自己设置statebar颜色。
几种全屏模式
Lean back
倾斜模式
When users want to bring back the system bars, they simply tap the screen anywhere.
1 | window.decorView.systemUiVisibility = |
轻触屏幕 会显示 底部导航如返回按钮
Immersive
沉浸模式:从边缘滑动,显示系统Bar,也可以通过回调显示系统控件
1 | window.decorView.systemUiVisibility = |
Sticky immersive
从边缘滑动,显示系统Bar,statebar.又恢复了。
1 | window.decorView.systemUiVisibility = |
https://developer.android.com/training/system-ui/immersive
android 11 systemUiVisibility过期需要更新
Statabar Color
Application AppTheme statusBarColor
1
2
3
4
5
6
7<style name="AppTheme" parent="Theme.AppCompat.Light.NoActionBar">
<!-- Customize your theme here. -->
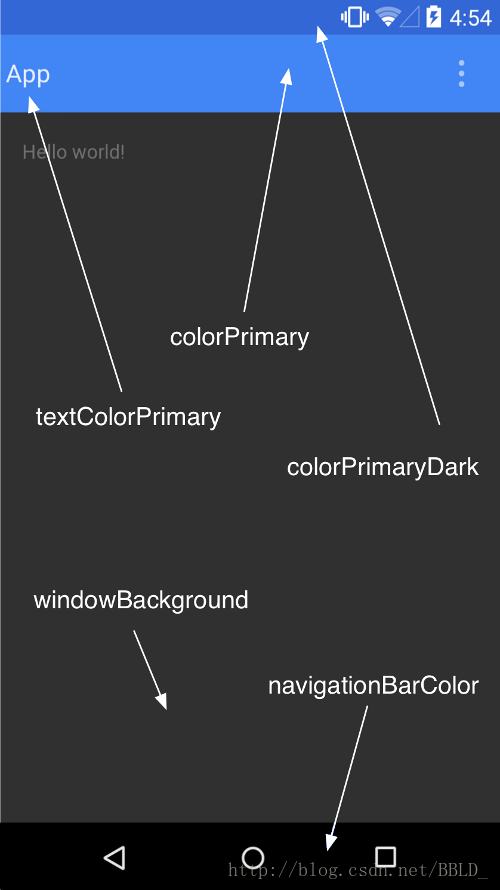
<item name="colorPrimary">@color/colorPrimary</item>
<item name="colorPrimaryDark">@color/colorPrimaryDark</item>
<item name="colorAccent">@color/colorAccent</item>
<item name="android:statusBarColor"> @android:color/white</item>
</style>Activity设置
1
2
3
4
5
6
7
8
9if (Build.VERSION.SDK_INT < Build.VERSION_CODES.R) {
window.decorView.systemUiVisibility =
View.SYSTEM_UI_FLAG_LIGHT_STATUS_BAR
} else {
window.insetsController?.setSystemBarsAppearance(
WindowInsetsController.APPEARANCE_LIGHT_STATUS_BARS,
WindowInsetsController.APPEARANCE_LIGHT_STATUS_BARS
)
}
Statabar element Color
两种方式
systemUiVisibility
1 | window.decorView.systemUiVisibility = SYSTEM_UI_FLAG_LAYOUT_STABLE //statebar 元素显示白色 |
主题配置>23
1 | <item name="android:windowLightStatusBar">false</item> |
false : 白色
true : 黑色
https://developer.android.com/training/system-ui
https://blog.csdn.net/shanshui911587154/article/details/86623646
WindowInsetsController
Android11 使用
statabar text color
1 |
|
statebar hide
1 | var isHide = true |
https://blog.csdn.net/jingzz1/article/details/111468726
https://juejin.cn/post/6940048488071856164
https://blog.csdn.net/qq_39038178/article/details/119657376
https://segmentfault.com/a/1190000022129198
ToolBar
颜色设置
AppTheme下的设置
1 | <application |
Toolbar颜色:
<item name="colorPrimary">@color/toolbar_color</item>状态栏设置 :
<item name="android:windowTranslucentStatus">true</item>
在 API 19 及更高版本上,Toolbar 内容延伸至状态栏上去了, statebar把toolbar给覆盖了
要解决这个问题就需要下面的属性android:fitsSystemWindows =”true”
这个属性能保持与statebar一定 的padding,能解决上面windowTranslucentStatus的重叠问题参考: 亦枫
去掉阴影线
toolbar底部会有一条阴影线,通过AppBarLayout标签下的app:elevation=”0dp”去掉
自定义返回键
mToolbar.setNavigationIcon(R.mipmap.ic_back);//自定义返回键
或者这样设置
app:navigationIcon="@mipmap/ic_back"
toolbar.xml解读
1 | <?xml version="1.0" encoding="utf-8"?> |
还有一种方式是在application设置,这样就不用集成baseActivity
http://blog.csdn.net/a553181867/article/details/51336899
menu设置
AppBarLayout下的 app:theme="@style/toolbar_menu"用于设置menu
menu字体颜色
需要设置 app:theme ,用 android:theme不起作用.
<item name="android:actionMenuTextColor">@color/text_my_black</item>
menu事件
@Override
public boolean onCreateOptionsMenu(Menu menu) {
    getMenuInflater().inflate(R.menu.menu_login, menu);
    menu.findItem(R.id.item_right_text).setTitle("注册"); //设置文字
    return true;
}

@Override
public boolean onOptionsItemSelected(MenuItem item) {
    switch (item.getItemId()) {

            break;
    }
    return super.onOptionsItemSelected(item);
}
https://blog.csdn.net/guyuealian/article/details/51721167
使用toolbar过程中遇到了一些问题
问题 1
弹出键盘后 editext不见了,应该是toolbar被拉伸了
暂时解决方式:
1 | <activity |
https://github.com/CoolThink/StatusBarAdapt/issues/2
fragment使用toolbar
http://wuxiaolong.me/2015/12/21/fragmentToolbar/
三条线的颜色修改
1 | <style name="DrawerArrowStyle" parent="Base.Widget.AppCompat.DrawerArrowToggle"> |
具体可以查看mineutil:PopupWindowActivity
- 溢出菜单三个点离右边的距离
AppTheme中设置
1 | <item name="android:actionOverflowButtonStyle">@style/OverflowMenuStyle</item> |
| 操作符 | 描述 | 例子 |
|---|---|---|
| & | 如果相对应位都是1,则结果为1,否则为0 | (A&B),得到12,即0000 1100 |
| | | 如果相对应位都是 0,则结果为 0,否则为 1 | (A | B)得到61,即 0011 1101 |
| ^ | 如果相对应位值相同,则结果为0,否则为1 | (A ^ B)得到49,即 0011 0001 |
https://noteforme.github.io/2018/01/07/Operators/
Support display cutouts
刘海屏
https://developer.android.com/guide/topics/display-cutout
https://blog.csdn.net/m0_64314432/article/details/121437314
https://developer.android.com/guide/topics/display-cutout?authuser=1
1 |
|
骨架屏加载效果
https://juejin.cn/post/6963143268448239653
https://github.com/ethanhua/Skeleton
https://www.jianshu.com/p/ded3c7e8adfe
DialogFragment 修改底部导航了