AndroidSource
Android docker
史上最简单Android源码编译环境搭建方法 | Weishu’s Notes
https://source.android.com/docs/setup/start/requirements#setting-up-a-linux-build-environment
https://www.zhihu.com/people/tian-weishu/answers?page=1
https://zwc365.com/2020/08/30/android10-baiduwangpan
ubuntu environment
ubuntu environment
user permission
- Open terminal.
- Type “su root” in the terminal and press enter
- You will be asked to enter the password. Type the password and press enter. You will be moved to root.
4.Type “usermod -aG sudo username”. Add your username, and enter. Nothing will happend. You will move to next line without any error. - Reboot/Restart the os.
https://www.youtube.com/watch?v=ZxOwFOtcaaA comment
download source code
https://mirrors.ustc.edu.cn/help/aosp.html
Download source code
- create bin
1 | |
update repository
Edit the file
~/bin/repoand replaceREPO_URL
1 | |
- sync code
// 有时候有中断,不用管继续下载
1 | |
git-repo | 镜像站使用帮助 | 清华大学开源软件镜像站 | Tsinghua Open Source Mirror
ubuntu 20.04 运行repo init 提示 /usr/bin/env: ‘python’: No such file or directory 解决方案
sudo ln -s /usr/bin/python3 /usr/bin/python
https://juejin.cn/post/7071152327482146823
同步源码树(以后只需执行这条命令来同步):
repo sync
https://blog.csdn.net/qq_34508943/article/details/133391020
Install required packages
To install required packages for Ubuntu 18.04 or later, run the following command:
1 | |
https://source.android.com/docs/setup/start
Docker AOSP
https://hub.docker.com/r/green369258/aosp
1 | |
代码下载在宿主机器上,和容器路径做映射。
问题
Docker环境下编译android源码|编译可运行xposed - iMisty - 博客园
编译有问题 https://hub.docker.com/r/praqma/aosp-build-container
https://hub.docker.com/r/davesrl/aosp/tags
https://hub.docker.com/r/inteldevcloudx77/aosp/tags
SOURCE CODE BUILD
android 12 源码编译与虚拟机调试_aosp running multiple emulators with the same avd-CSDN博客
- 初始化编译环境
1 | |
选择产品
76 sdk_phone_x86_64-englunch
使用lunch选择要编译的产品,此文档中以编译x86_x64 emulator模拟器镜像为例进行说明。
emulator
修改AndroidProduct.mk使支持x86_x64镜像编译
由于android12 默认lunch默认选不到模拟器镜像,所以首先需要修改mk。
修改build/make/target/product/AndroidProducts.mk文件,添加sdk_phone_x86_64-eng支持
1 | |
原文链接:https://blog.csdn.net/qq_17696807/article/details/124302856
lunch sdk_phone_x86_64-eng
Dokcer Build
1 | |
build issue
libncurses.so.5
1 | |
32 bit - How to install libncurses.so.5 in Ubuntu 20.04? - Ask Ubuntu
https://blog.csdn.net/qq_34508943/article/details/133391020
- get into /etc/apt/sources.list.d and locate ubuntu.sources.
- open the terminal in that directory by right clicking in it.
- then run sudo nano ./ubuntu.sources a pluma editor will open.
- just add these lines:-
1 | |
emulator: ERROR: x86 emulation currently requires hardware acceleration
Ubentu编译Android源码(AOSP) - 有点理想的码农 - 博客园
python error
/usr/bin/env: ‘python’: No such file or directory-CSDN博客
docker error
USER问题(由于运行的docker 容易没有配置USER环境变量)
1 | |
1 | |
也可以在docker构建文件Dockerfile中加上如下语句:
1 | |
Unable to compile AOSP source code on Ubuntu 24.04 system - Stack Overflow
https://github.com/alsutton/aosp-build-docker-images
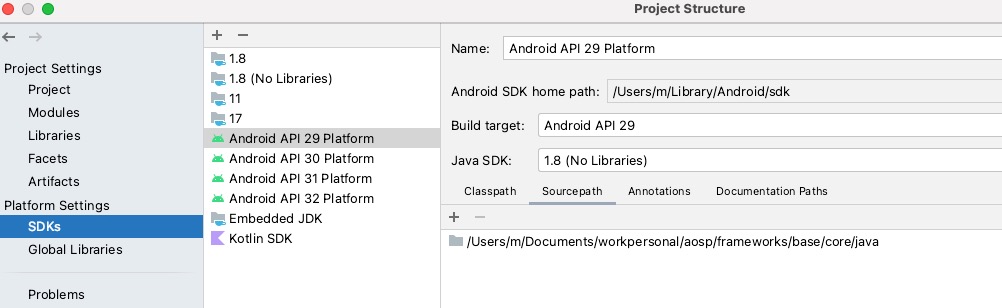
import Android studio
emulator run
1 | |
import Android studi
SWAP RAM
1 | |
要学习Android源码需要编译一份,然后安装要求导入AndroidStudio,可以参考: http://blog.csdn.net/huaiyiheyuan/article/details/52069122
Activity启动过程
对应用程序Activity进行编译和打包
/home/jon/桌面/LaoLuo/chapter-7/src/packages/experimental/Activity
make snod
emulator
然后查看activity信息,在这里通过源码里面的 adb
cd  /home/jon/AOSP/out/host/linux-x86/bin
adb shell dumpsys activity
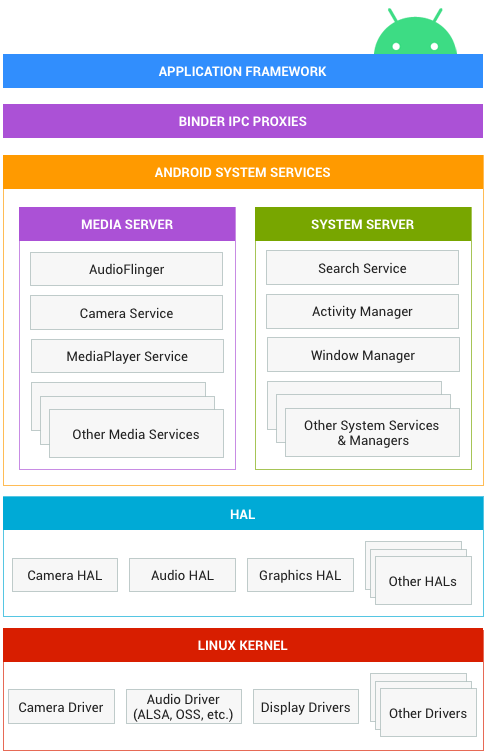
Android open source project
Android Architecture
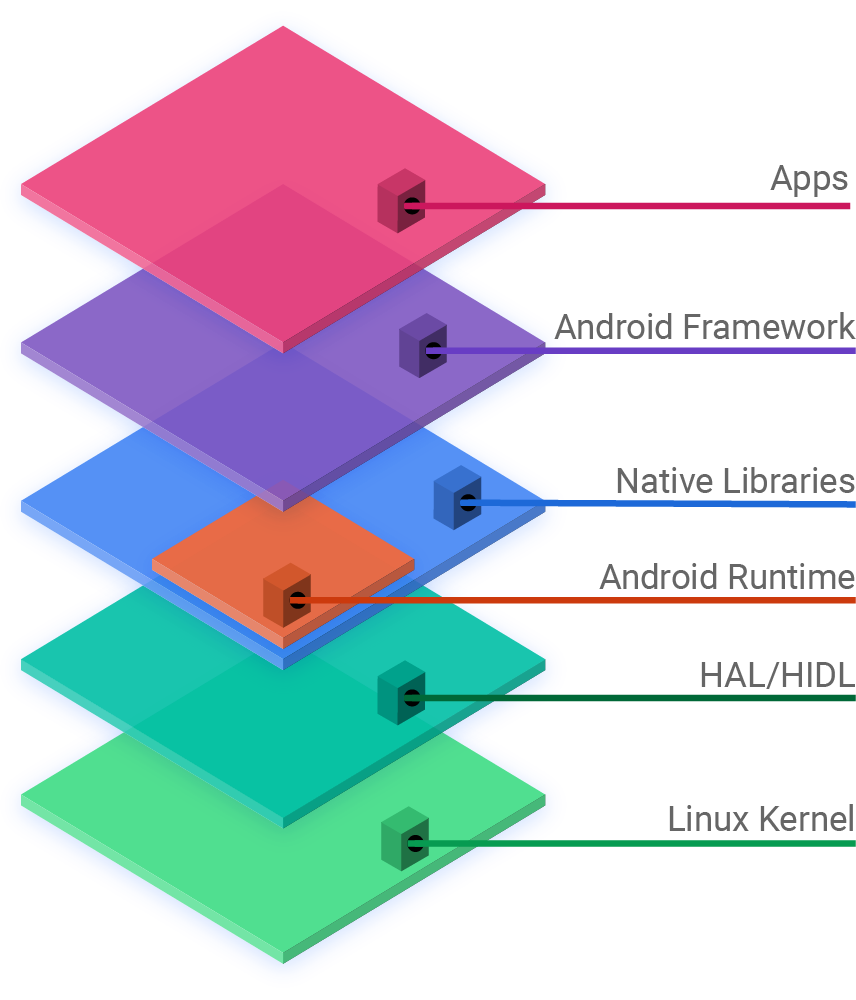
https://source.android.com/
https://source.android.com/devices/architecture
https://blog.csdn.net/wenzhi20102321/article/details/80739649
https://blog.csdn.net/wen0006/article/details/5804639
源码关联阅读
也可以选择对应的文件的 .class文件后,再选择源码后再建立关联。
https://www.jianshu.com/p/8012d5d38b01
Ubuntu 24.04 + Windows 10/11 双引导系统无损安装 | AI开源项目 模型微调必备 - YouTube
https://www.zhihu.com/people/tian-weishu/answers?page=5
Binder
https://www.zhihu.com/question/39440766/answer/81511893