https://developer.android.google.cn/training/dependency-injection/dagger-basics
https://www.bilibili.com/video/BV1hF411W7aj 动脑
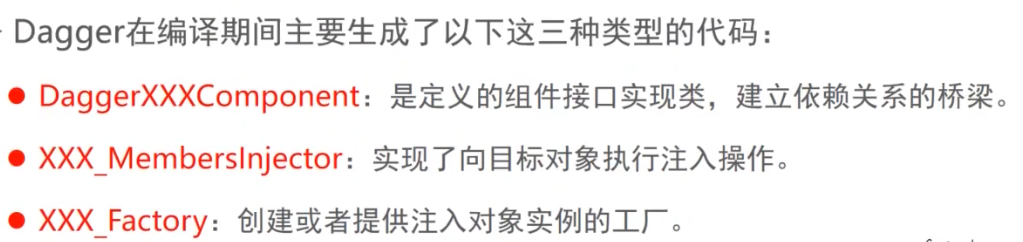
注入3要素
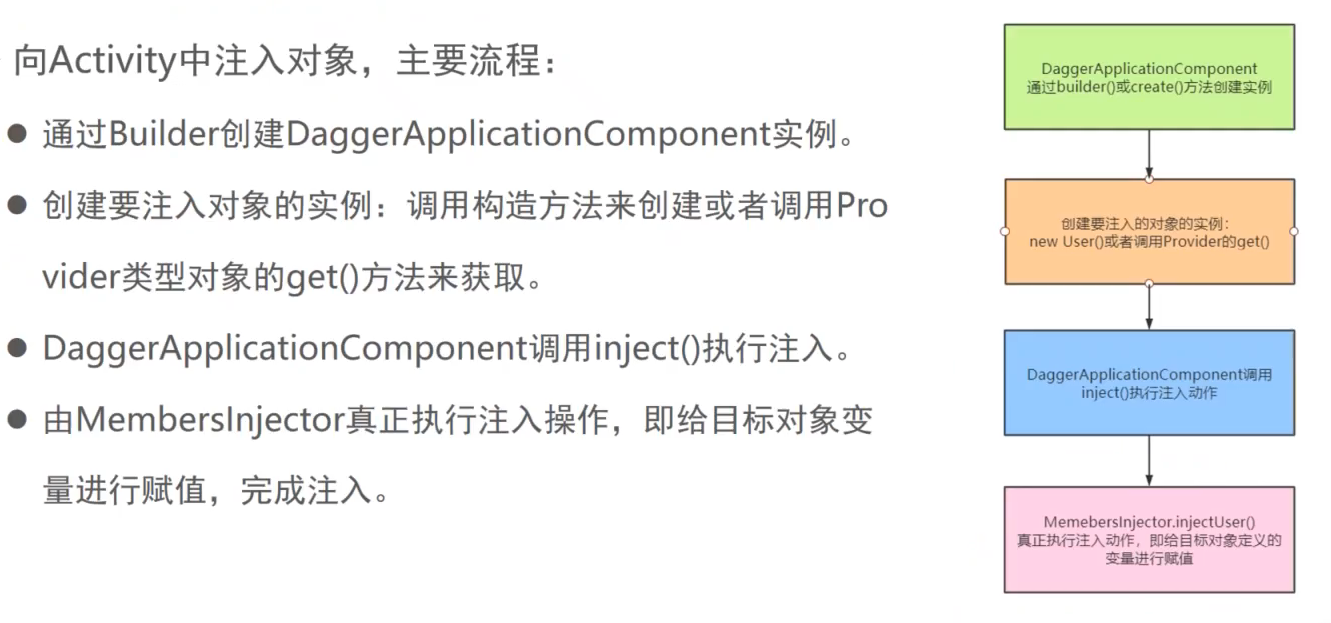
注入流程
构造方法对象注入
创建User4对象
1
| class User4 @Inject constructor()
|
创建ApplicationComponent4
1
2
3
4
| @Component
interface ApplicationComponent4 {
fun inject(mainActivity: MainActivity4?)
}
|
执行注入.
1
2
3
4
5
6
7
8
9
10
11
12
| class MainActivity4 : AppCompatActivity() {
var TAG = javaClass.simpleName
@Inject
lateinit var user:User4
override fun onCreate(savedInstanceState: Bundle?) {
super.onCreate(savedInstanceState)
setContentView(R.layout.activity_main3)
DaggerApplicationComponent4.create().inject(this)
Log.i(TAG, "onCreate: user= $user")
}
}
|
第三方对象注入(一)
Module :Module可以提供多个对象,返回类型要不一样 。
Component :IOC容器, 用来注入对象,module集成到component身上,再由Component把对象注入到平时用的Activity或者目的类身上。
依赖的查找顺序为:先找@Module,如果找到了就停止,如果找不到就去找@Inject
1
2
3
4
5
6
7
8
9
10
11
12
13
14
15
16
17
18
19
20
21
22
23
24
25
26
27
28
29
30
31
32
33
34
35
| class HttpObject // 也可直接在这里提供对象,不用Module
@Module
class HttpModule {
@Provides
fun provideHttpObject():HttpObject{
return HttpObject()
}
}
@Component(modules = [HttpModule::class, DataBaseModule::class])
interface MyComponent {
fun inject(activity: DaggerxxActivity)
}
class DaggerxxActivity : AppCompatActivity() {
private val binding by lazy { ActivityDaggerXxBinding.inflate(layoutInflater) }
private val TAG = "DaggerxxActivity"
@Inject
lateinit var httpObject: HttpObject
@Inject
lateinit var databaseObject: DatabaseObject
override fun onCreate(savedInstanceState: Bundle?) {
super.onCreate(savedInstanceState)
setContentView(binding.root)
DaggerMyComponent.create().inject(this)
Log.i(TAG, "onCreate: httpObject $httpObject databaseObject $databaseObject ")
}
}
|
https://juejin.cn/post/6844903850319544328
第三方对象注入(一)
1
2
3
4
5
6
7
| @Module
class AppModule6 {
@Provides
fun provideUser(): User6 {
return User6()
}
}
|
1
2
3
4
5
| @Singleton
@Component(modules = [AppModule6::class])
interface ApplicationComponent6 {
fun inject(mainActivity: MainActivity6)
}
|
1
2
3
4
5
6
7
| class MainActivity6 : AppCompatActivity() {
@Inject
lateinit var user: User6
override fun onCreate(savedInstanceState: Bundle?) {
DaggerApplicationComponent6.create().inject(this)
}
}
|
依赖注入概念
- 构造方法注入
- Setter注入(字段注入)
1
2
3
4
5
6
7
8
9
10
11
12
13
14
15
16
17
18
19
20
21
| public class Car {
Engine engine;
public Car(Engine engine) {
this.engine = engine;
}
public void setEngine(Engine engine) {
this.engine = engine;
}
public void start(){
engine = new Engine();
engine.start();
}
}
class Engine{
public void start(){}
}
|
IOC框架
- 基于反射的方式实现: Spring IOC(动态的进行依赖关系的建立)
- 静态方式 : 程序在编译时就已经提供好了建立依赖关系的类。Dagger2
两种注入方式
Dagger注入
构造方法注入
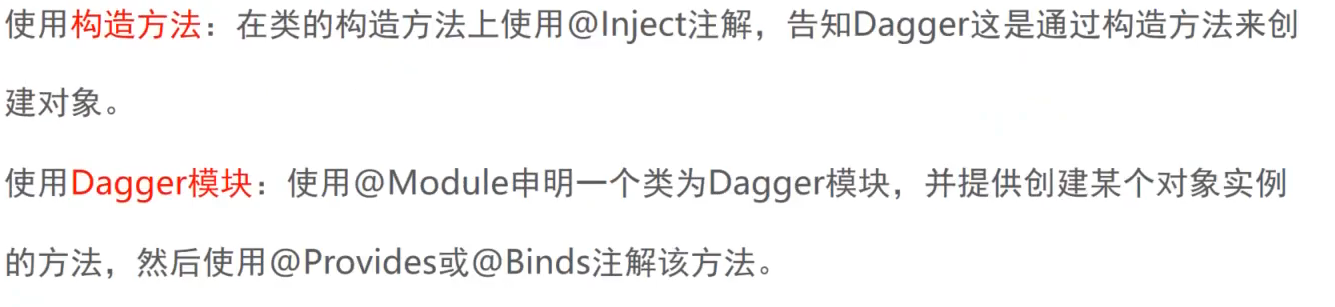
构造方法构造实例注入步骤
使用 @Inject注解在构造方法上;就是告知Dagger可以通过构造方法来创建并获取到User的实例
1
2
|
class User @Inject constructor()
|
当作IOC容器,把对象注入到目标类中
1
2
3
4
5
|
@Component
interface ApplicationComponent {
fun inject(daggerActivity: DaggerActivity?)
}
|
设置Inject注解
DaggerActivity.java
执行注入动作
1
2
3
4
5
6
7
8
9
10
11
12
13
|
@Inject
User user;
@Override
protected void onCreate(Bundle savedInstanceState) {
super.onCreate(savedInstanceState);
setContentView(R.layout.activity_dagger2);
DaggerApplicationComponent.create().inject(this);
Log.i(TAG, "user: " + user);
}
|
Dagger Module注入
第三方框架的类,实现依赖注入, 上面User是我们自己定义的类,
第二种方式告知Dagger,可以通过调用该方法来获取到注入对象的实例
1
2
3
4
5
6
7
8
9
10
11
12
13
14
| @Module
class NetModule {
fun providerUser(): User {
return User()
}
@Provides
fun provideRetrofit(): Retrofit {
return Retrofit.Builder()
.baseUrl("http://www.google.com")
.build()
}
}
|
compoent
1
2
3
4
5
6
| // 2. Component可以当作IOC容器,然后把对象注入到目标类中
// 设置作用域和ApplicationComponent组件的生命周期一致
@Component(modules = [NetModule::class]) //模块装载到组件上去
interface ApplicationComponent {
fun inject(daggerActivity: DaggerActivity?) //指定DaggerActivity作为要注入的目标类
}
|
DaggerActivity.java
1
2
3
4
5
6
7
8
9
10
11
| public class DaggerActivity extends AppCompatActivity {
String TAG = "DaggerActivity";
@Inject
Retrofit retrofit;
Log.i(TAG, "retrofit: " + retrofit);
}
|
Retrofit注入
1
2
3
4
5
| public interface ApiService {
@GET("/user/info")
Call<String> requestInfo();
}
|
1
2
3
4
5
6
7
8
|
@Provides
public ApiService provideApiService(Retrofit retrofit){
return retrofit.create(ApiService.class);
}
|
1
2
3
4
5
| @Inject
ApiService apiService;
Log.i(TAG, "apiService: " +apiService);
|
Module已经知道怎么获取retrofit实例
接着同一个Module中的方法,就可以作为参数直接传入 使用
// 比如provideApiService需要Retrofit实例,会从当前容器查找是否已经有Retrofit实例
// 然后从当前容器直接获取
1
2
3
4
5
6
7
8
9
10
11
12
13
14
15
16
17
18
19
20
21
22
23
24
25
26
27
| @Module
public class NetModule {
@Provides
public Retrofit provideRetrofit(){
return new Retrofit.Builder()
.baseUrl("http://www.google.com")
.build();
}
@Provides
public ApiService provideApiService(Retrofit retrofit){
return retrofit.create(ApiService.class);
}
@Provides
public OkHttpClient provideOkHttpClient() {
return new OkHttpClient.Builder().build();
}
}
|
局部单例实现

作用域
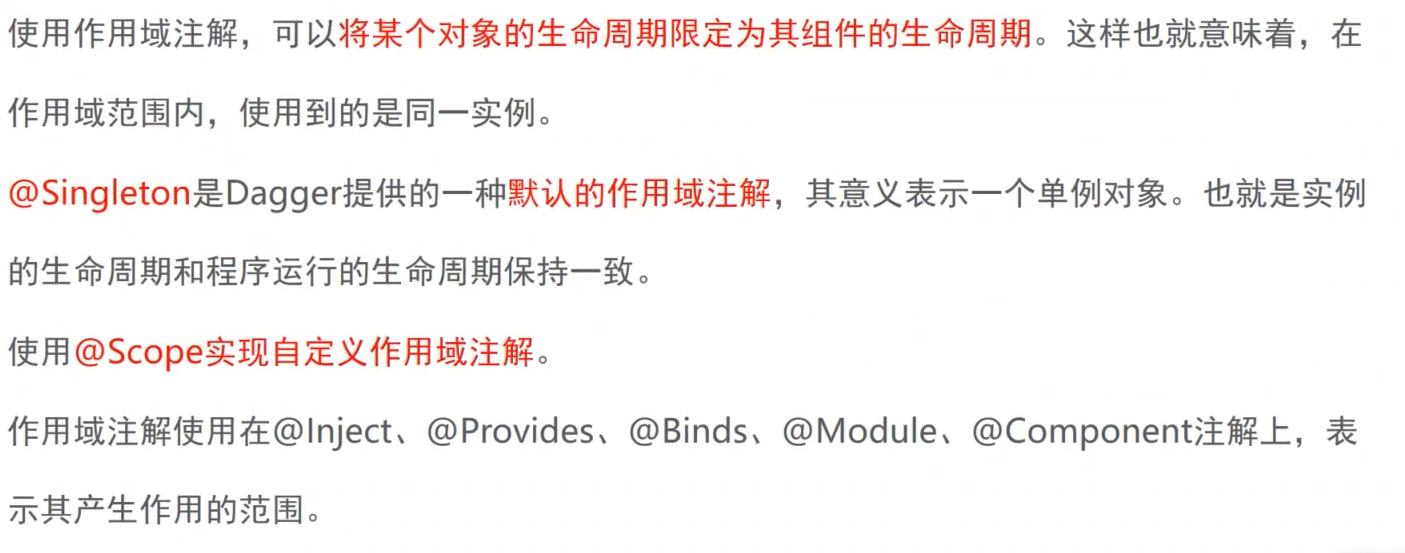
将某个对象的生命周期限定为其组件的生命周期。
下面User,Retrofit ,ApiService, OkHttpClient对象实例指定了作用域是Singleton,那么载入这些对象的组建ApplicationComponent1也必须用作用域是Singleton.
要么不使用 作用域 即默认的作用域, 如果使用的话,就必须保证他们的作用域一致。
局部实例1
1
2
3
4
5
6
7
8
9
10
11
12
13
14
15
16
17
18
19
20
21
22
23
24
25
26
27
28
29
30
31
32
33
34
35
36
37
38
39
40
41
42
43
|
@Module
public class NetModule1 {
public User providerUser() {
return new User();
}
@Singleton
@Provides
public Retrofit provideRetrofit(OkHttpClient okHttpClient) {
return new Retrofit.Builder()
.client(okHttpClient)
.baseUrl("http://www.google.com")
.build();
}
@Singleton
@Provides
public ApiService provideApiService(Retrofit retrofit) {
return retrofit.create(ApiService.class);
}
@Singleton
@Provides
public OkHttpClient provideOkHttpClient() {
return new OkHttpClient.Builder().build();
}
}
|
1
2
3
4
5
6
7
8
|
@Singleton
@Component(modules = {NetModule1.class})
public interface ApplicationComponent1 {
void inject(DaggerActivity daggerActivity);
void inject(SecondActivity secondActivity);
}
|
1
2
3
4
5
6
7
8
9
10
11
12
13
14
15
16
17
18
19
20
21
22
23
24
25
26
27
28
29
30
31
32
33
34
35
| public class DaggerActivity extends AppCompatActivity {
String TAG = "DaggerActivity";
@Inject
User user;
@Inject
User user2;
@Inject
Retrofit retrofit;
@Inject
ApiService apiService;
@Inject
ApiService apiService2;
@Override
protected void onCreate(Bundle savedInstanceState) {
super.onCreate(savedInstanceState);
setContentView(R.layout.activity_dagger2);
DaggerApplicationComponent.create().inject(this);
Log.i(TAG, "user: " + user);
Log.i(TAG, "user2: " + user2);
Log.i(TAG, "retrofit: " + retrofit);
Log.i(TAG, "apiService: " +apiService);
Log.i(TAG, "apiService2: " +apiService2);
}
}
|
运行结构
1
2
3
4
5
| 2092-2092/com.comm.util I/DaggerActivity: user: com.comm.util.dagger.dn.di.User@2129cef
2092-2092/com.comm.util I/DaggerActivity: user2: com.comm.util.dagger.dn.di.User@d97d3fc
2092-2092/com.comm.util I/DaggerActivity: retrofit: retrofit2.Retrofit@d243a85
2092-2092/com.comm.util I/DaggerActivity: apiService: retrofit2.Retrofit$1@a1fa0da
2092-2092/com.comm.util I/DaggerActivity: apiService2: retrofit2.Retrofit$1@a1fa0da
|
可以看到 user 是2个实例
apiService用了同一个对象实例,所以可以看到和DaggerApplicationComponent组件生命周期一致。
局部实例2
添加一个Activity
1
2
3
4
5
6
7
8
9
10
11
12
13
14
15
16
17
| public class SecondActivity extends AppCompatActivity {
String TAG = "SecondActivity";
@Inject
ApiService apiService3;
@Override
protected void onCreate(Bundle savedInstanceState) {
super.onCreate(savedInstanceState);
setContentView(R.layout.activity_second2);
DaggerApplicationComponent.create().inject(this);
Log.i(TAG, "apiService3: " + apiService3);
}
}
|
1
| void inject(SecondActivity secondActivity);
|
1
| startActivity(new Intent(this,SecondActivity.class));
|
1
2
3
| 7410-7410/com.comm.util I/DaggerActivity: apiService: retrofit2.Retrofit$1@a1fa0da
7410-7410/com.comm.util I/DaggerActivity: apiService2: retrofit2.Retrofit$1@a1fa0da
2021-08-29 22:28:35.812 7410-7410/com.comm.util I/SecondActivity: apiService3: retrofit2.Retrofit$1@84eb79a
|
不同的DaggerApplicationComponent组件,不同的实例
全局实例
保证组件全局实例
Module作用域生命周期和 ApplicationComponent保持一致。
MyApplication.java
1
2
3
4
5
| static ApplicationComponent applicationComponent = DaggerApplicationComponent.create();
public static ApplicationComponent getApplicationComponent() {
return applicationComponent;
}
|
1
| MyApplication.getApplicationComponent().inject(this);
|
1
2
3
| 8044-8044/com.comm.util I/DaggerActivity: apiService: retrofit2.Retrofit$1@516190b
8044-8044/com.comm.util I/DaggerActivity: apiService2: retrofit2.Retrofit$1@516190b
8044-8044/com.comm.util I/SecondActivity: apiService3: retrofit2.Retrofit$1@516190b
|
使用作用域遵循的规则
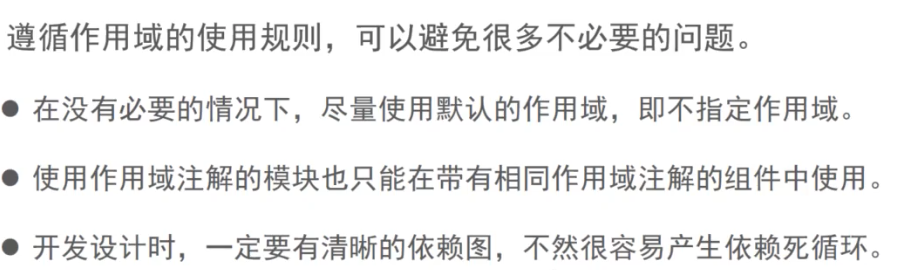
组件ApplicationComponent指定了作用域,组件中的模块modules = {NetModule.class},也要指定相同的作用域。
NetModule中的方法设置@Singleton 那么ApplicationComponent也必须设置@Singleton
NetModule中的方法设置@MyScope 那么ApplicationComponent也必须设置@MyScope
1
2
3
4
5
6
7
8
| @Singleton
@Component(modules = {NetModule.class})
public interface ApplicationComponent {
void inject(DaggerActivity daggerActivity);
void inject(SecondActivity secondActivity);
}
|
组件依赖
因为,一个Acitivty不能有两个组件直接注入,不如ApplicationComponent 和UserComponent.
组建依赖与子组建主要解决了不同作用域时组建之间复用问题.
- 在一个组件置顶作用域后,就已经确定了该组建创建对象的生命周期。 但是有些对象的实例可能生命周期更短。这个时候就需要定义新的组建。
- 新组件需要使用原组建的部分资源
两种实现方式
- 为@Component添加dependencies参数,指定该组建依赖新的组件。
- 直接使用@Subcomponent注解创建新的组件,并装载到父组件中。
https://www.bilibili.com/video/BV1Ki4y1A7hA?p=07
来看方式一
实例部分全局
实现 Retrofit ,ApiService 进程下全局, User2类 Activity全局
MyScope是自定义的作用域,用Singleton也可以,主要是保证组建作用域全局单例,感觉和hilt有点不同
1
2
3
4
5
6
7
8
9
10
| @MyScope
@Component(modules = {NetModule2.class})
public interface ApplicationComponent2 {
void inject(DaggerUserActivity daggerActivity);
Retrofit retrofit();
ApiService apiService();
}
|
1
2
3
4
5
6
| @UserScope
@Component(modules = [UserModule2::class], dependencies = [ApplicationComponent2::class])
interface UserComponent2 {
fun inject(activity: DaggerUserActivity2)
fun inject(activity: DaggerSecondActivity2)
}
|
1
2
3
4
5
6
7
8
9
10
11
12
13
14
15
16
17
18
19
20
21
22
23
24
25
26
27
28
29
30
31
32
33
34
35
36
37
38
39
40
| @Module
class NetModule2 {
fun providerUser(): User2 {
return User2()
}
@MyScope
@Provides
fun provideRetrofit(okHttpClient: OkHttpClient?): Retrofit {
return Retrofit.Builder()
.client(okHttpClient)
.baseUrl("http://www.google.com")
.build()
}
@MyScope
@Provides
fun provideApiService(retrofit: Retrofit): ApiService {
return retrofit.create(ApiService::class.java)
}
@MyScope
@Provides
fun provideOkHttpClient(): OkHttpClient {
return OkHttpClient.Builder().build()
}
}
|
注意ApplicationComponent2要提供对应Module的方法
1
2
3
4
5
6
7
8
9
| @MyScope
@Component(modules = [NetModule2::class])
interface ApplicationComponent2 {
fun inject(daggerActivity: DaggerUserActivity)
fun retrofit(): Retrofit
fun apiService(): ApiService
fun provideContext(): Context
}
|
1
2
3
4
5
6
7
8
9
10
11
12
13
| public class MyApplication extends Application {
static ApplicationComponent2 applicationComponent = DaggerApplicationComponent2.create();
private static MyApplication app;
public static ApplicationComponent2 getApplicationComponent2() {
return applicationComponent;
}
public static MyApplication getInstance() {
return app;
}
}
|
1
2
3
4
5
6
7
8
9
10
11
12
13
14
15
16
17
18
19
20
21
22
23
24
25
26
27
28
29
30
31
32
| class DaggerUserActivity2 : AppCompatActivity() {
var TAG = javaClass.simpleName
@Inject
lateinit var user1: User2
@Inject
lateinit var user2: User2
@Inject
lateinit var apiService1: ApiService
@Inject
lateinit var apiService2: ApiService
var userComponent: UserComponent2? = null
override fun onCreate(savedInstanceState: Bundle?) {
super.onCreate(savedInstanceState)
setContentView(R.layout.activity_dagger_user)
userComponent = DaggerUserComponent2.builder().applicationComponent2(
MyApplication.getApplicationComponent2()
).build()
userComponent?.inject(this)
Log.i(TAG, "user1: $user1")
Log.i(TAG, "user2: $user2")
Log.i(TAG, "apiService1: $apiService1")
Log.i(TAG, "apiService2: $apiService2")
startActivity(Intent(this, DaggerSecondActivity2::class.java))
}
}
|
从结果上, Retrofit 是全局单例,User2对象是Activity单例
1
2
3
4
5
6
| 399 10821-10821/com.comm.util I/DaggerUserActivity2: user1: com.comm.util.dagger.dn.di.User2@1da0e9b
399 10821-10821/com.comm.util I/DaggerUserActivity2: user2: com.comm.util.dagger.dn.di.User2@1da0e9b
399 10821-10821/com.comm.util I/DaggerUserActivity2: apiService1: retrofit2.Retrofit$1@12da238
399 10821-10821/com.comm.util I/DaggerUserActivity2: apiService2: retrofit2.Retrofit$1@12da238
438 10821-10821/com.comm.util I/DaggerSecondActivity2: user3: com.comm.util.dagger.dn.di.User2@8233396
438 10821-10821/com.comm.util I/DaggerSecondActivity2: apiService3: retrofit2.Retrofit$1@12da238
|
提供全局Application
demo代码有问题 NPR
子组件方式
优势
1
2
3
4
5
| 下面的interface ApplicationComponent3
父组件不用定义 这些方法
fun retrofit(): Retrofit
fun apiService(): ApiService
fun context(): Context
|
1
2
3
4
5
6
7
8
|
@MyScope
@Component(modules = [SubComponentModule::class])
interface ApplicationComponent3 {
fun inject(daggerActivity: DaggerUserActivity)
fun studentComponent():StudentComponent.Factory
}
|
1
2
| @Module(subcomponents = [StudentComponent::class])
class SubComponentModule
|
1
2
3
4
5
6
7
| @Module
class StudentModule {
@Provides
fun provideStudent(): Student {
return Student()
}
}
|
1
2
3
4
5
6
7
8
9
10
| @Subcomponent(modules = [StudentModule::class])
interface StudentComponent {
@Subcomponent.Factory
interface Factory {
fun create(): StudentComponent
}
fun inject(activity: DaggerSecondActivity3)
}
|
1
2
3
4
5
6
7
8
9
10
11
12
13
14
15
| class DaggerSecondActivity3 : AppCompatActivity() {
var TAG = javaClass.simpleName
@Inject
lateinit var student: Student
override fun onCreate(savedInstanceState: Bundle?) {
super.onCreate(savedInstanceState)
setContentView(R.layout.activity_second2)
DaggerApplicationComponent3.create().studentComponent().create().inject(this)
Log.i(TAG, "student: $student ")
}
}
|
结果同样注入成功
/com.comm.util I/DaggerSecondActivity3: student: com.comm.util.dagger.dn.di.Student@6c29d80
Binds注入接口实例
之前用的是 module总 provide对象提供方式 ,想下面这种的。
1
2
3
4
5
6
7
| @Module
class StudentModule {
@Provides
fun provideStudent(): Student {
return Student()
}
}
|
通过这种方式注入的优势是,直接使用接口,不需要具体的实现, AInterfaceImpl01改成AInterfaceImpl02就能改注入实例
1
2
| @Inject
lateinit var aInterface: AInterface
|
还一个优势是子组件StudentComponent也可以用来处理注入
1
2
3
4
5
6
7
8
9
10
11
| @Subcomponent(modules = [StudentModule::class])
interface StudentComponent {
@Subcomponent.Factory
interface Factory {
fun create(): StudentComponent
}
fun inject(activity: DaggerSecondActivity3)
fun inject(activity: DaggerSecondActivity4)
}
|
1
2
| class AInterfaceImpl01 : AInterface
class AInterfaceImpl02 : AInterface
|
1
2
3
4
5
6
7
8
9
10
11
12
13
14
15
16
17
18
19
20
| @Module
abstract class TestModule {
@Binds
abstract fun bindAInterface(impl: AInterfaceImpl01): AInterface
companion object {
@JvmStatic
@Provides
fun provideAInterfaceImpl01(): AInterfaceImpl01 {
return AInterfaceImpl01()
}
@JvmStatic
@Provides
fun provideAInterfaceImpl02(): AInterfaceImpl02 {
return AInterfaceImpl02()
}
}
}
|
1
2
3
4
5
6
7
| @MyScope
@Component(modules = [SubComponentModule::class,TestModule::class])
interface ApplicationComponent3 {
fun inject(daggerActivity: DaggerUserActivity)
fun studentComponent():StudentComponent.Factory
}
|
1
2
3
4
5
6
7
8
9
10
11
12
13
14
15
16
17
18
| class DaggerSecondActivity4 : AppCompatActivity() {
var TAG = javaClass.simpleName
@Inject
lateinit var student: Student
@Inject
lateinit var aInterface: AInterface
override fun onCreate(savedInstanceState: Bundle?) {
super.onCreate(savedInstanceState)
setContentView(R.layout.activity_second2)
DaggerApplicationComponent3.create().studentComponent().create().inject(this)
Log.i(TAG, "student: $student ")
Log.i(TAG, "aInterface: $aInterface ")
}
}
|
相同类创建不同的对象
1
2
3
4
5
6
7
8
9
10
11
12
13
14
15
| @Module
class StudentModule {
@Named("student1")
@Provides
fun provideStudent(): Student {
return Student()
}
@Named("student2")
@Provides
fun provideStudent2(): Student {
return Student("John")
}
}
|
1
2
3
4
5
6
7
8
9
10
11
12
13
14
15
16
17
18
19
20
21
22
23
| class DaggerSecondActivity4 : AppCompatActivity() {
var TAG = javaClass.simpleName
@Named("student1")
@Inject
lateinit var student1: Student
@Named("student2")
@Inject
lateinit var student2: Student
override fun onCreate(savedInstanceState: Bundle?) {
super.onCreate(savedInstanceState)
setContentView(R.layout.activity_second2)
DaggerApplicationComponent3.create().studentComponent().create().inject(this)
Log.i(TAG, "StudentQualifier1: $StudentQualifier1 ")
Log.i(TAG, "StudentQualifier2: $StudentQualifier2 ")
}
}
|
也可以自定义标识,注解标识,通过标识找到对象
1
2
3
4
5
| @Qualifier
@Documented
@Retention(RUNTIME)
public @interface StudentQualifier1 {
}
|
1
2
3
4
5
6
7
8
9
10
11
12
13
14
15
16
17
18
19
20
21
22
23
24
25
26
27
28
29
30
31
32
33
| @Module
class StudentModule {
@Provides
fun provideStudent1(): Student {
return Student()
}
@Named("student1")
@Provides
fun provideStudent(): Student {
return Student()
}
@Named("student2")
@Provides
fun provideStudent2(): Student {
return Student("John")
}
@StudentQualifier1
@Provides
fun provideQualifierStudent(): Student {
return Student()
}
@StudentQualifier2
@Provides
fun provideQualifierStudent2(): Student {
return Student("Qualifier2 John")
}
}
|
1
2
3
4
5
6
7
8
9
10
11
12
13
14
15
16
17
18
19
20
21
| class DaggerSecondActivity4 : AppCompatActivity() {
var TAG = javaClass.simpleName
@StudentQualifier1
@Inject
lateinit var StudentQualifier1: Student
@StudentQualifier2
@Inject
lateinit var StudentQualifier2: Student
override fun onCreate(savedInstanceState: Bundle?) {
super.onCreate(savedInstanceState)
setContentView(R.layout.activity_second2)
DaggerApplicationComponent3.create().studentComponent().create().inject(this)
Log.i(TAG, "StudentQualifier1: $StudentQualifier1 ")
Log.i(TAG, "StudentQualifier2: $StudentQualifier2 ")
Log.i(TAG, "aInterface: $aInterface ")
}
}
|